Fun, Easy Letter Press Technique-Card Tutorial
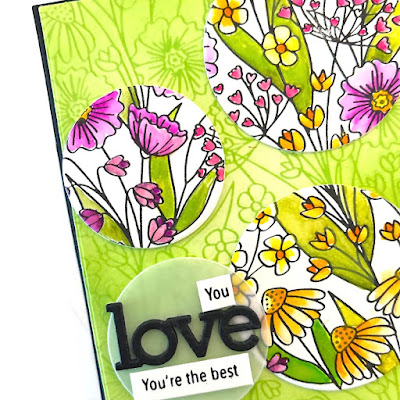
Good morning! Today I have a fun and easy letter press card tutorial for you. I am using new press plates from the Summer 2024 release from LDRS Creative. This is an easy card that’s perfect for all occasions!
Card Supplies
Watercolor markers
Foam tape
Vellum
White card stock
Black card stock
Card Instructions
We need a top-folding A2 card base for this card. We need two pieces of the white, cotton watercolor panels. I used the Master Layout 1 rectangle dies and cut the larger rectangle from plain black card.
Next I used the Wallflower press plates and LDRS Prickly Pear Perfection Hybrid Ink. Using the Spellbinder’s Better Press system I placed the plate on the magnetic area. I then taped a panel of the cotton card stock to the top plate. I inked the plate and ran it through my Platinum 6. Then I (lightly) ink blended the entire panel with the same ink. I repeated this process with the other white panel, using Raven Hybrid Ink. Make sure the black ink is dry. Then color the panel with whatever you want. I used some watercolor markers.
Now we will cut some circles from colored panel. I used some nesting circle dies and decided where I wanted my circles to appear on the final card. Die-cut your circles and set aside. I also cut a circle from a piece of vellum, for the sentiment. Don’t discard the rest of the colored panel. You can use it for another card!
Use the Simply Word dies and cut the word love from several pieces of black card stock. I cut 4 and glued them together. I also cut 3 additional pieces. I will glue these to the back once it is on the vellum. I used the Happy Me Happy You Sentiment Stack stamp and die to create the small sentiment. I love this stamp and die combo as it is so easy to create multiple sentiments at once. I did a little sentiment surgery and cut the word “You” from one of the strips. I want to place that above the love diecut. I am also using the “You are the Best” strip to place below it.
To assemble the card:
Glue the green panel to the larger black one with liquid glue.
Line up the colored circles and adhere with foam tape.
Glue the love diecut to the vellum circle. Glue the additional pieces to the back. This is to make it level with the foam tape on the back of the colored circle.
Add a bit of foam tape to your sentiment strips and place down. Add liquid glue to the back of the diecut word on the vellum. (I trimmed the love diecuts I placed on the back of the vellum). Adhere to panel.
Now glue the entire panel to the base.
That’s it, the card is done! I hope you are inspired by my card. I encourage your to check out the new Summer 2024 collection from LDRS Creative. There are some stunning new products! If this card inspired to purchase any of the products, please use the affiliate links above. I greatly appreciate it. There is no additional cost to you. Thank you for stopping by! Have a fabulous, crafty day❤️.
I


Comments
Post a Comment