FUNN with Craft Roulette
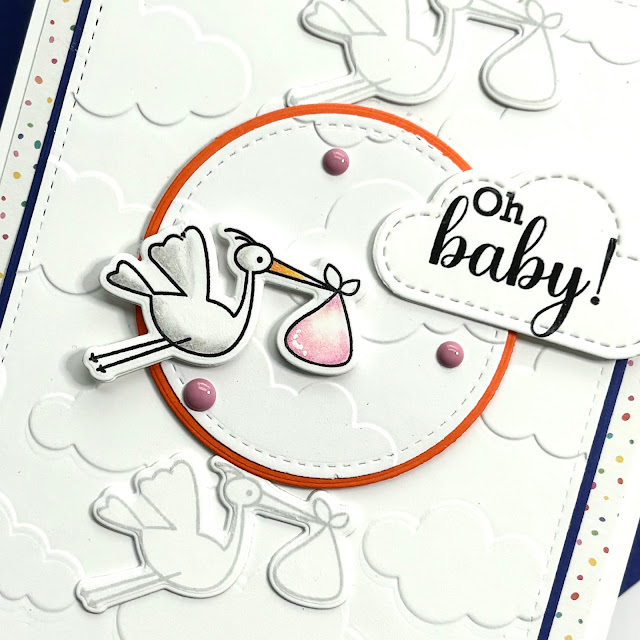
Good Morning! I have a sweet little baby card tutorial for you. I created it for my submission for the Craft Roulette challenge. If you haven't joined the Craft Roulette YouTube challenge here is the link for you! Craft Roulette I hope to see you there! It is a great card challenge and a great group of people. It's just a fun way to spend a couple hours on a Friday night if you are a crafter!
Products Used
Gina K Designs Master Layouts 3
Gina K Designs Master Layouts 2
Gina K Designs April Showers Bundle -*Great for all occasions*
Beautiful Day Patterned Paper-LDRS Creative
Head in the Clouds embossing folder (great price!)
My Sweet Petunia Glue Press (I LOVE this tool!)
Prisma Colored Pencils
Gamsol
White card stock
Colored card stock
Card Instructions
- Cut, score, and fold a top-folding A2 card base.
- Use GKD Master Layouts 2 to cut the large rectangle from colored card stock and a stitched rectangle from white card stock.
- Cut a piece of coordinating, patterned paper 1/8" larger than the blue piece.
- Glue the patterned paper to your card base.
- Glue the blue panel on top of the patterned paper.
- Use the two-circle dies from Master Layouts three. Cut a piece of colored card stock with the large circle.
- Place the stitched circle into the upper, middle of the white stitched panel and die-cut.
- To emboss the white pieces I used Head in the Clouds embossing folder.
- Place the stitched, white circle back into the white card panel.
- Place in the folder and run through your die machine (following the instructions for your machine).
- Glue the white circle onto the orange circle with glue.
- I stamped the stork, from the GKD Spring Showers set, three times.
- I stamped it once in Raven Hybrid Ink.
- I added clear embossing powder and embossed.
- The other two I stamped in a grey, hybrid ink.
- Stamp the "Oh Baby!" with black ink and heat emboss with clear powder. I also used a cloud die from my stash, to cut this out.
- Stamp a sentiment inside (or don't!)
- Die-cut (or don't-it's up to you!) additional storks from white scraps. I glued them together for dimension.
- Color the black inked, stork with colored pencils
- Decide on the placement of your elements and adhere with a strong, liquid glue.
- Add some embellishments (or don't!). I used some enamel dots.


Comments
Post a Comment